“TensorFlow - Install CUDA, CuDNN & TensorFlow in AWS EC2 P2”
This article was written in 2017 which some information need to be updated by now. In particular the Amazon AMI instance is free now. Nevertheless, sometimes building a AMI for your software platform is needed and therefore I will leave this article AS IS.
We deploy our TensorFlow applications to the AWS EC2 with Nvidia GPU(s). In the first half, we use an Amazon Deep Learning AMI. In the second half, we build a TensorFlow platform from scratch using Ubuntu.
EC2 P2 spot instance with Deep Learning AMI
Amazon EC2 instances with GPU are expensive. Therefore, we pick the spot instances to reduce the cost. Nevertheless, spot instances can be terminated when your maximum bidding price falls below the current price. To mitigate that, we can create and attach another EBS volume to the instance. This additional volume stores training data, results and checkpoints. When an instance is terminated, we create a new instance and re-attach the EBS volume to the new instance. The training can later be resumed from the checkpoints.
Different AWS regions have different pricing. Usually N. Virginia, Ohio, Oregon have cheaper price. Terminate the instance when it is not needed.
The cheapest instance with a GPU is p2.xlarge. For a p2.xlarge instance in 2017, the lowest AMI charge is $0.9/hour while the lowest spot instance charge is $0.2/hour.
p2.xlarge and Deep Learning AMI
In the AWS console, we create a new p2.xlarge spot instance.
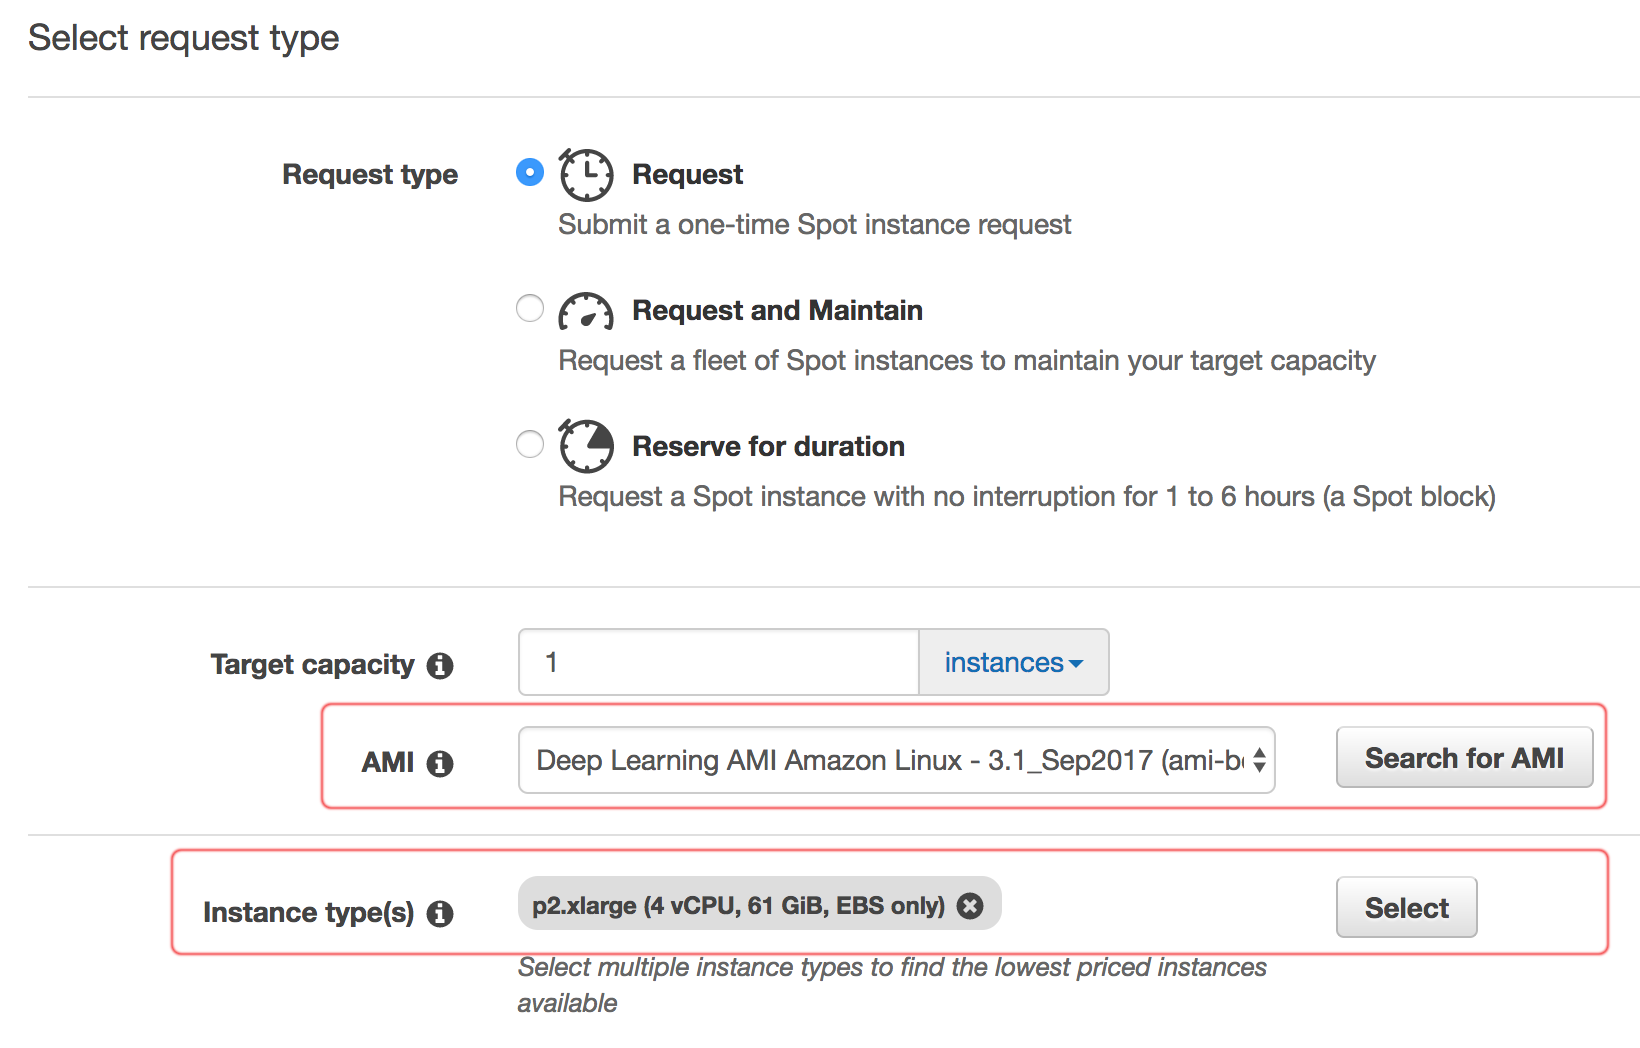
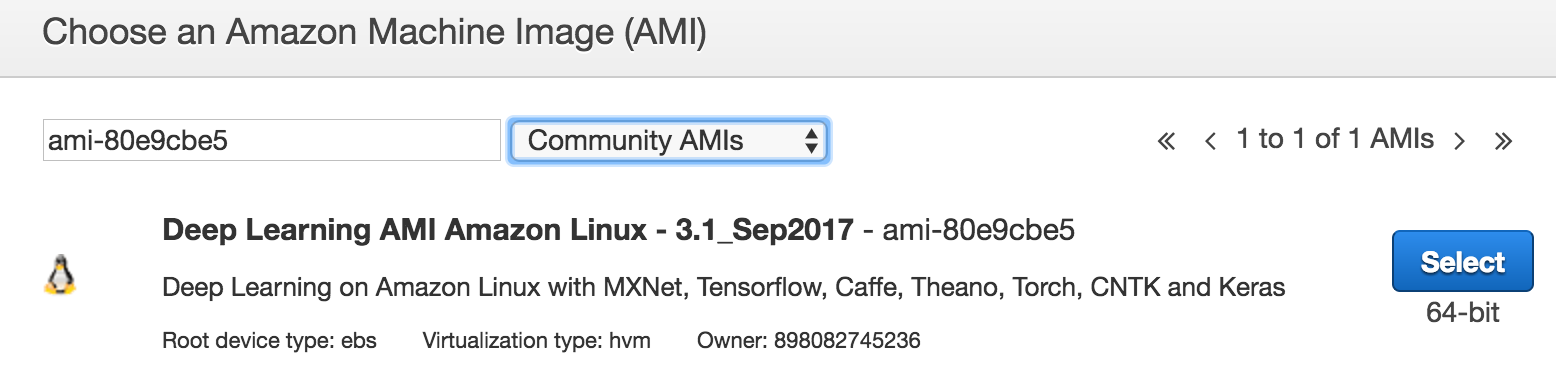
Then locate the Deep learning AMI.
Network setting
We keep the default for the network.
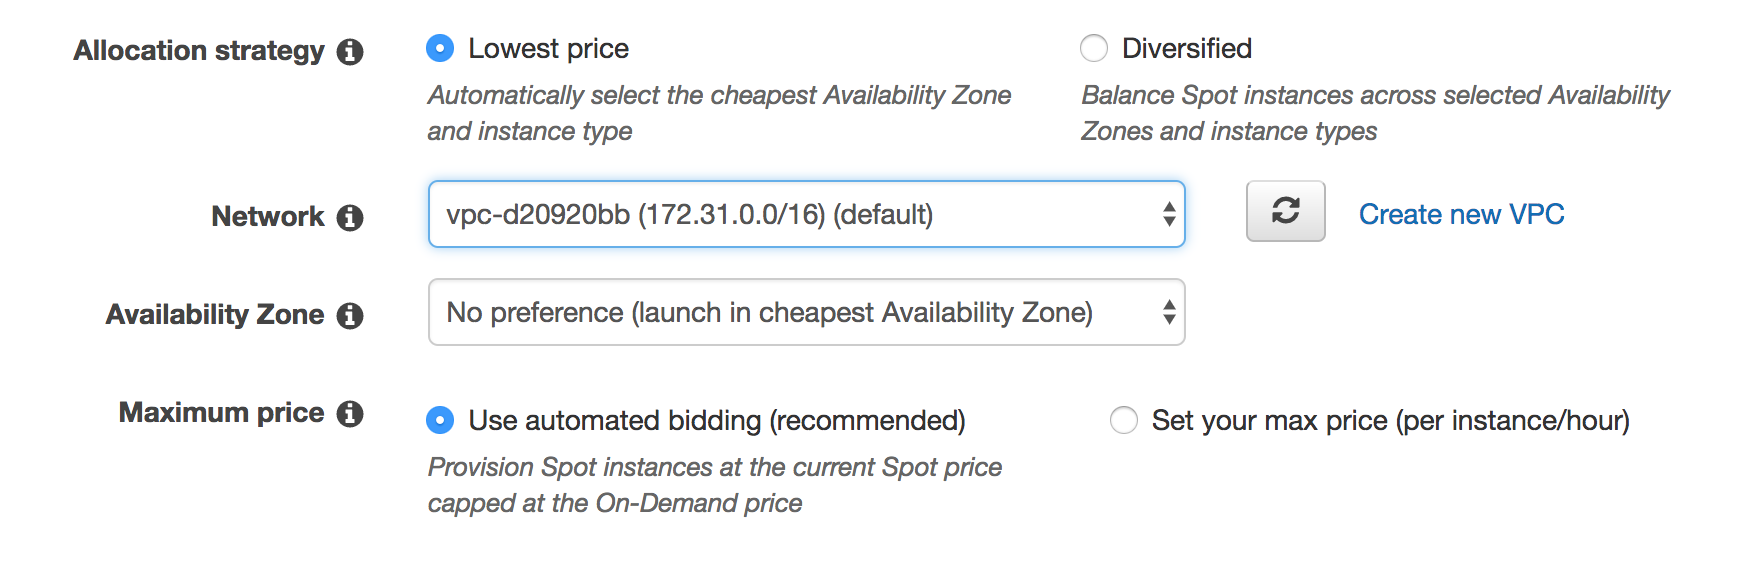
Different regions may have different network configurations.
Storage
In the next page, we keep the setting in the storage and instance details. A 50 GiB EBS volume is created.
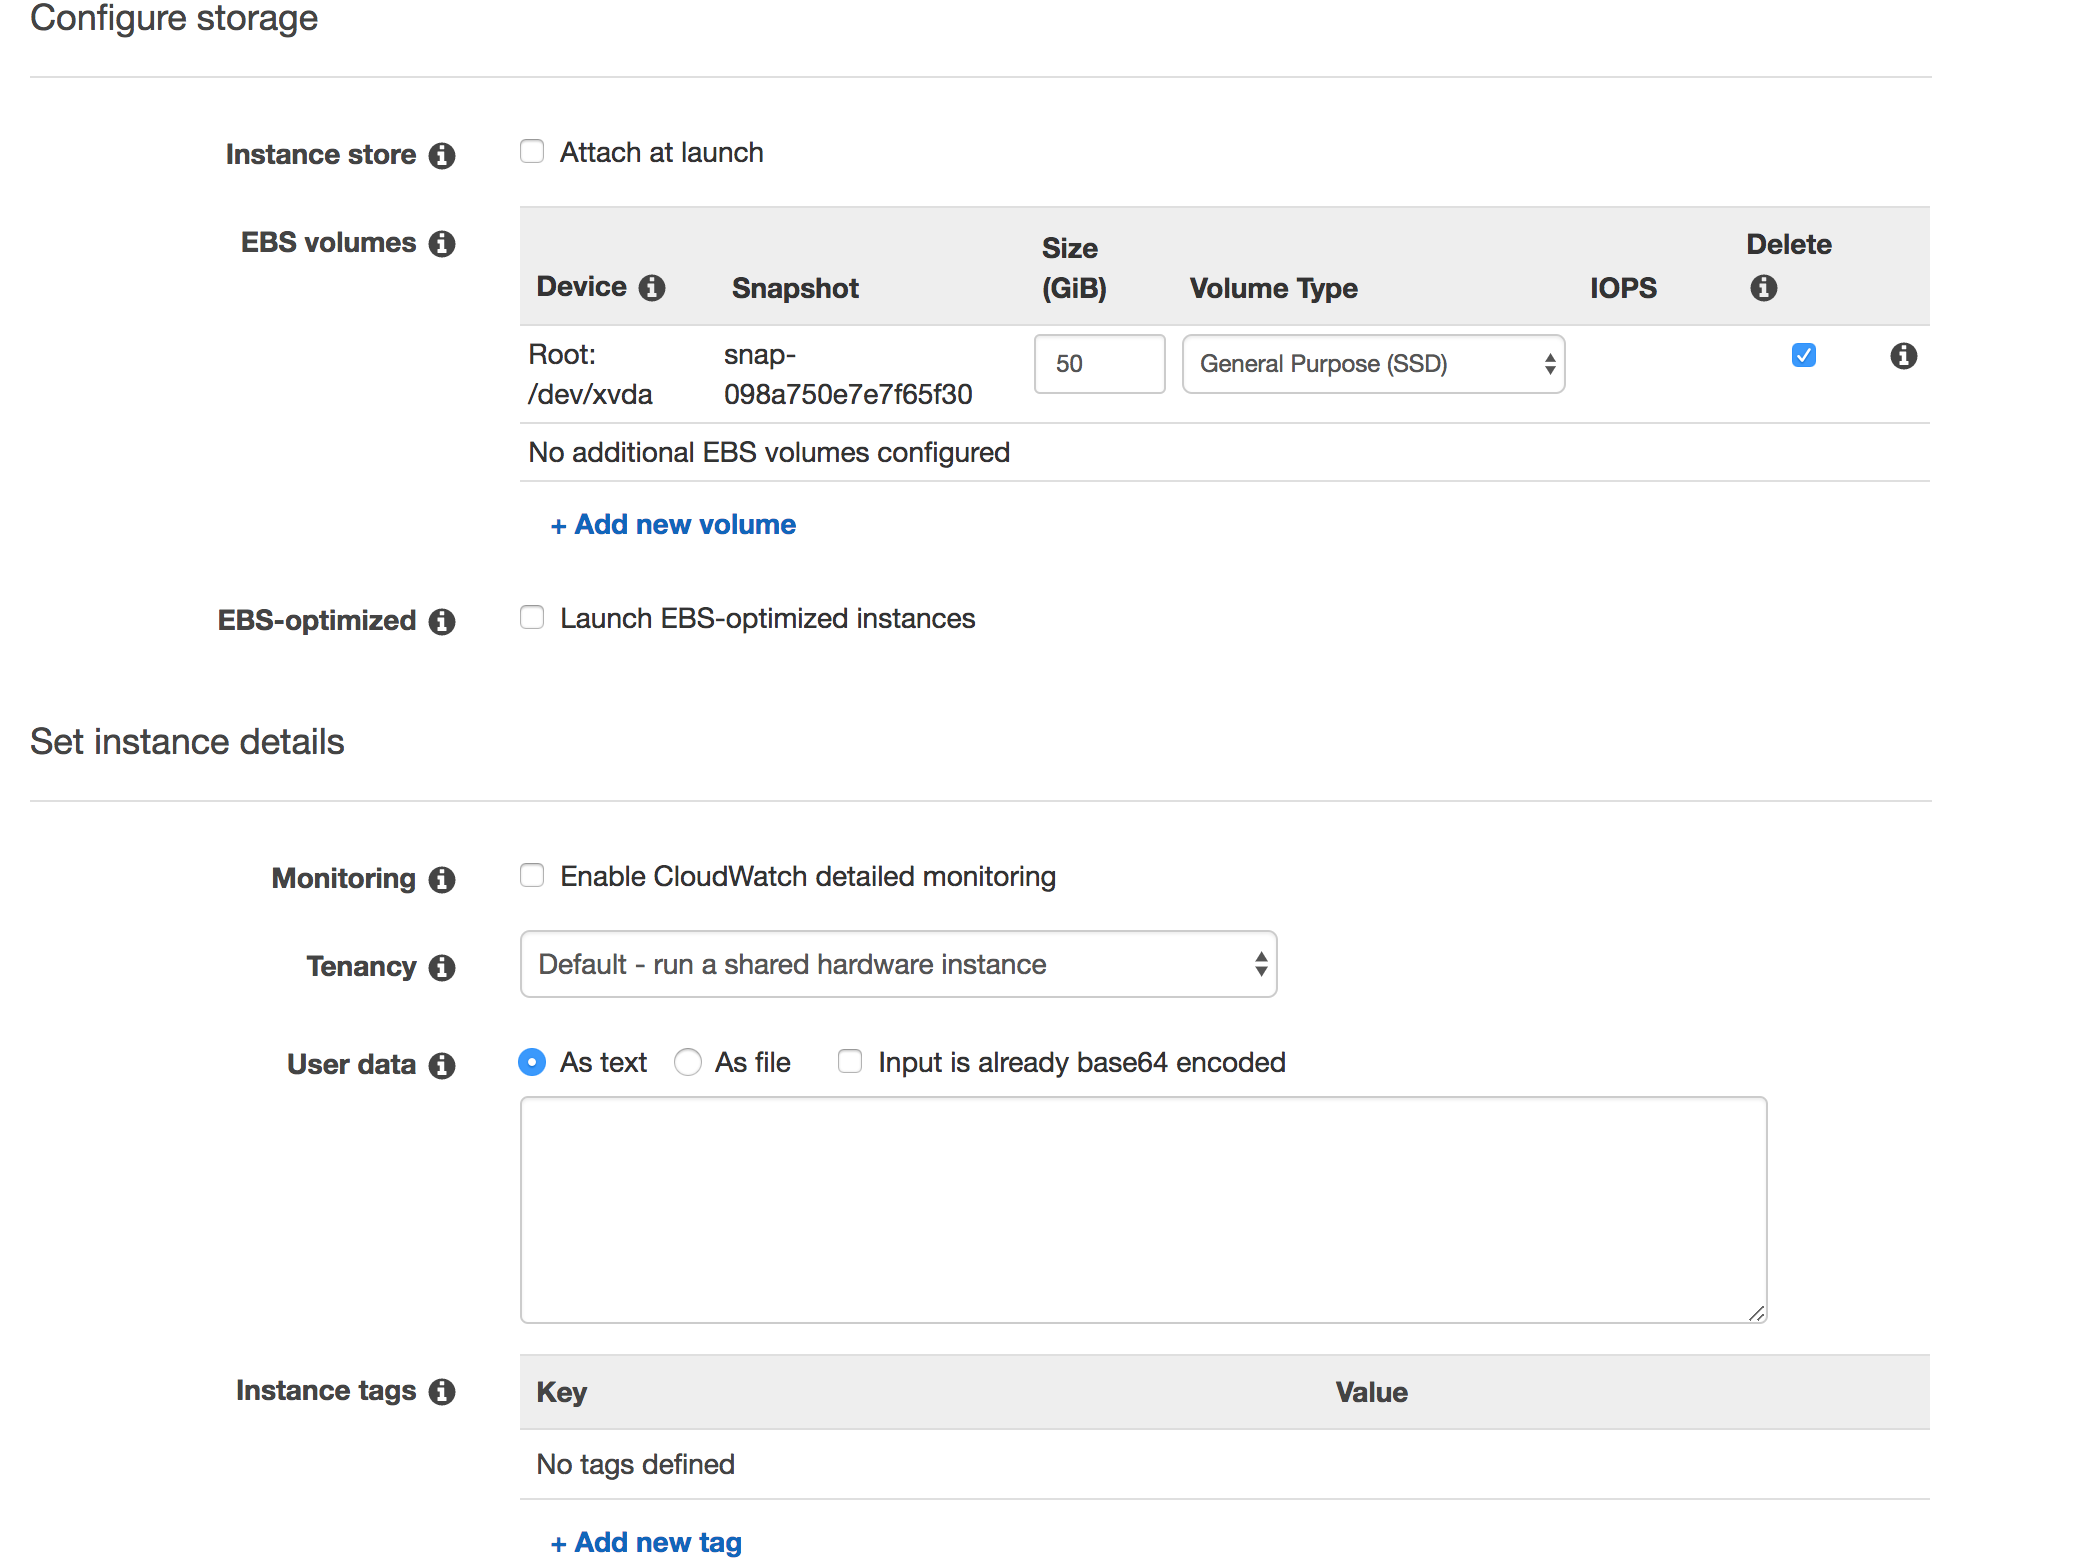
We can attach another EBS volume to store permanent data later.
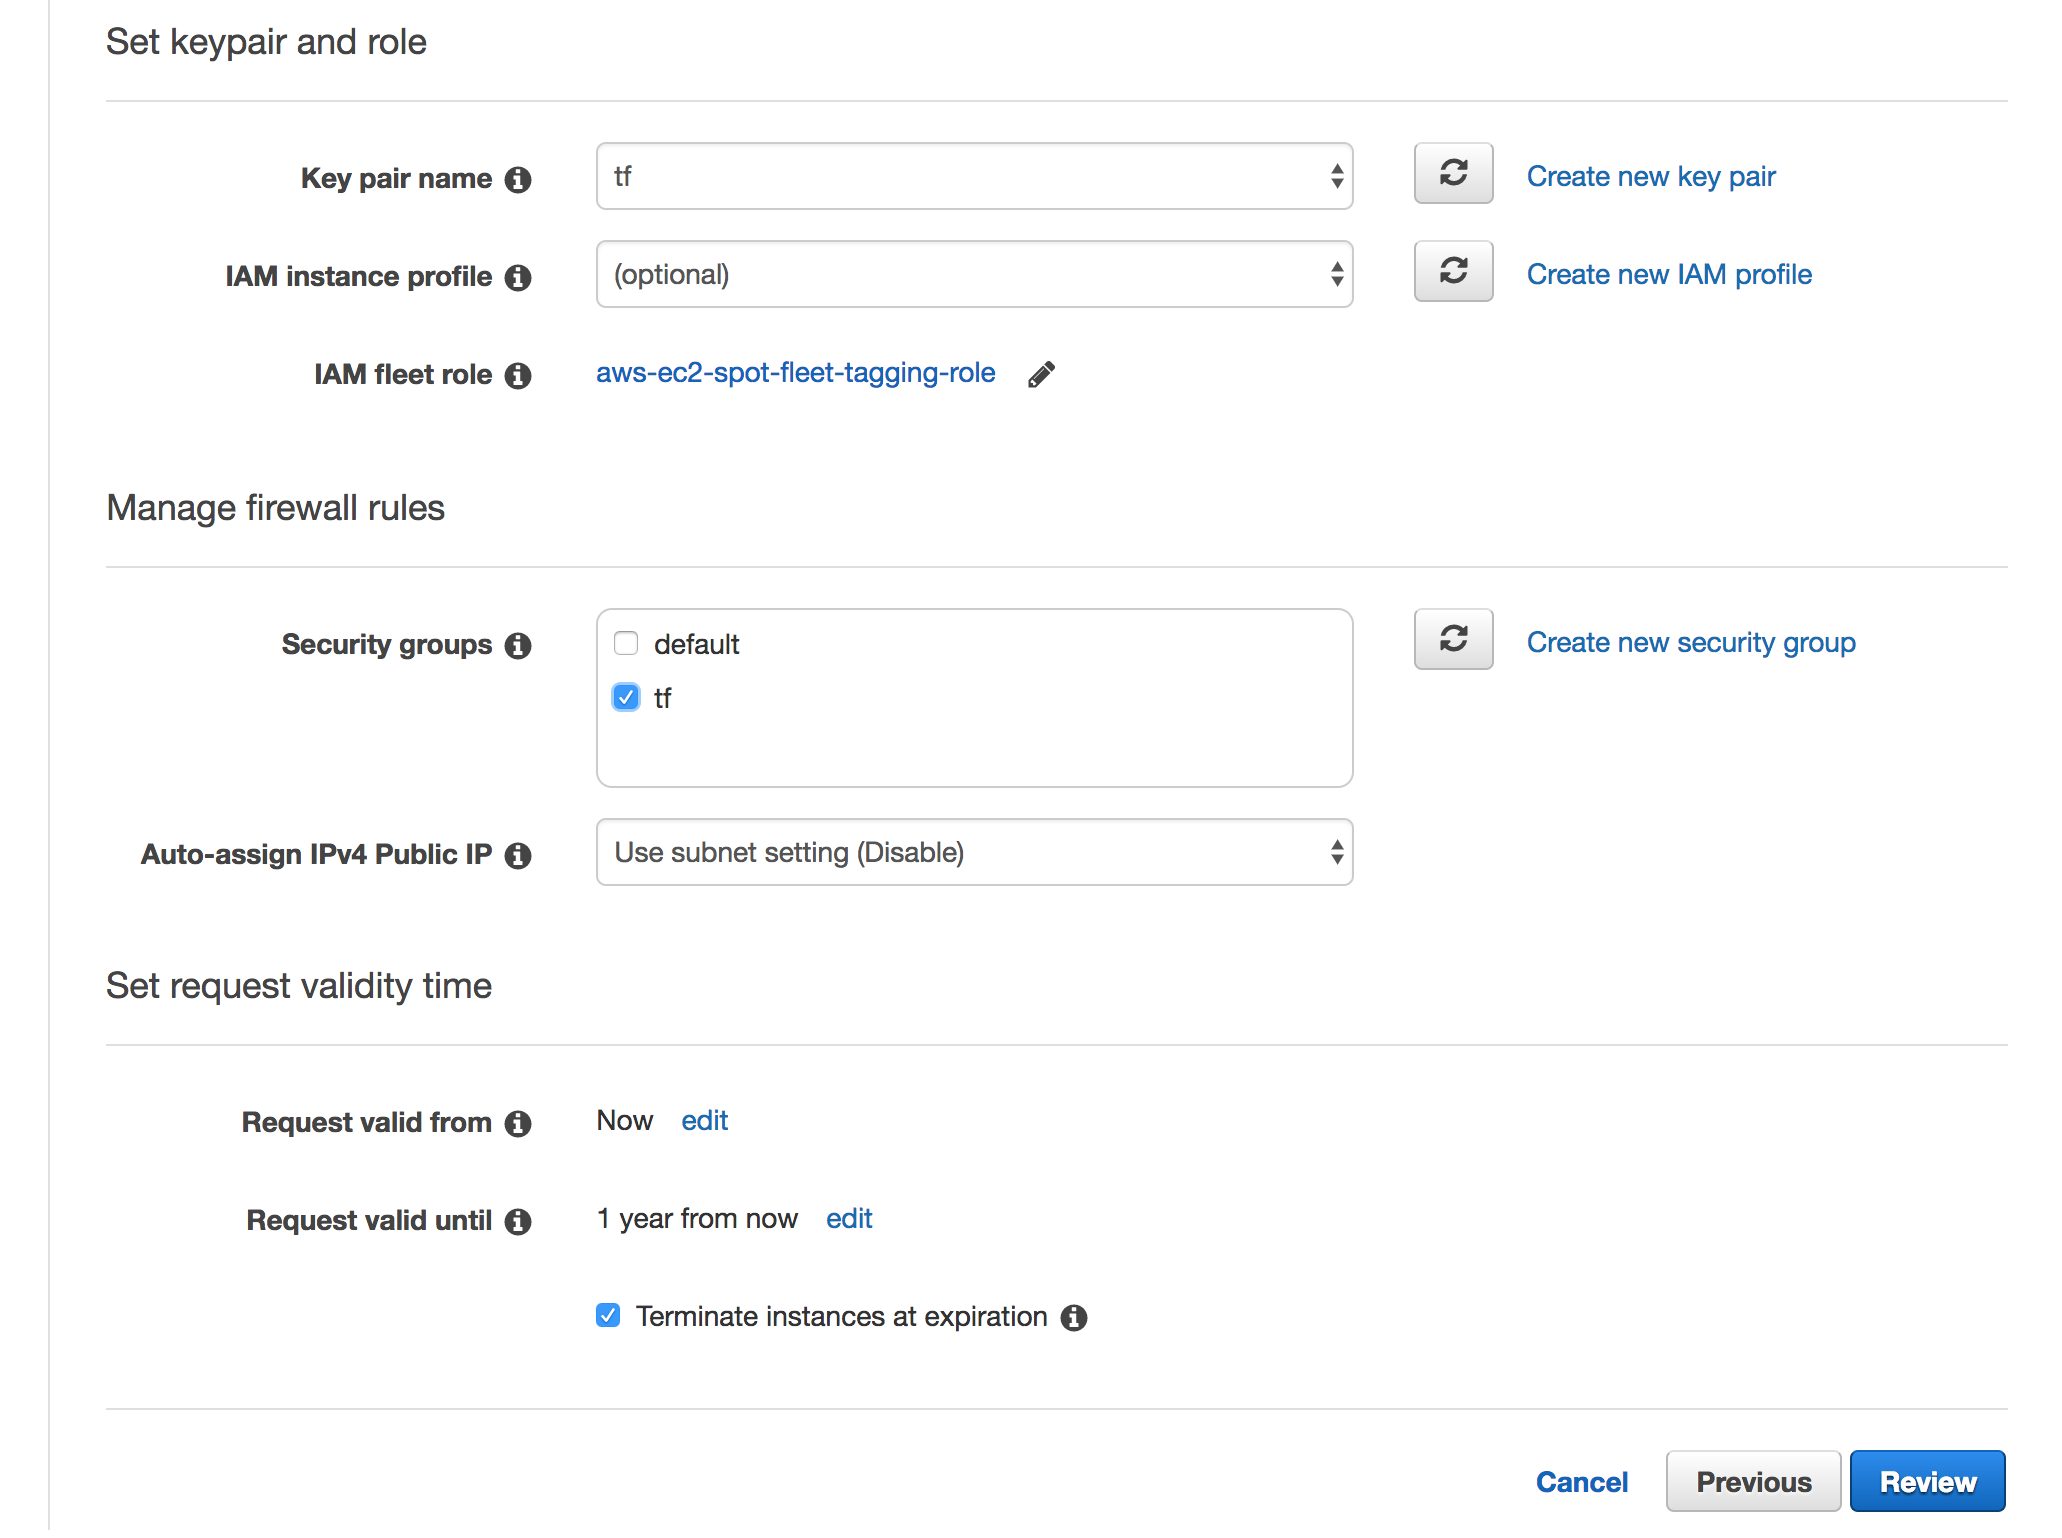
Keypair and security
We configure a key and a security group for the new instance:
Create a new key pair:

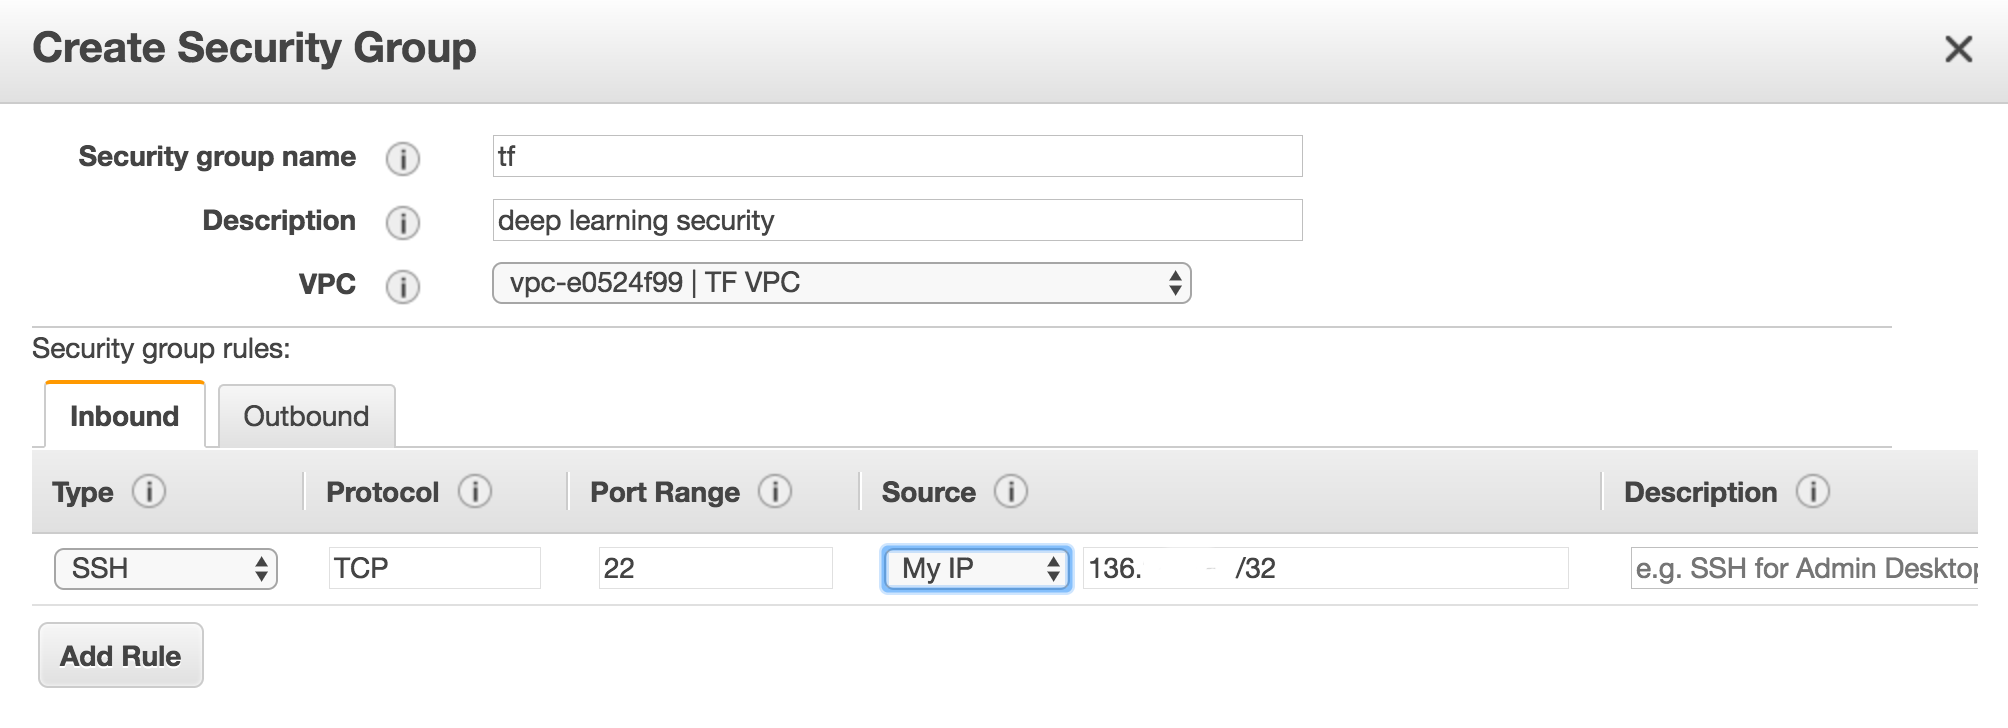
Create a security group:
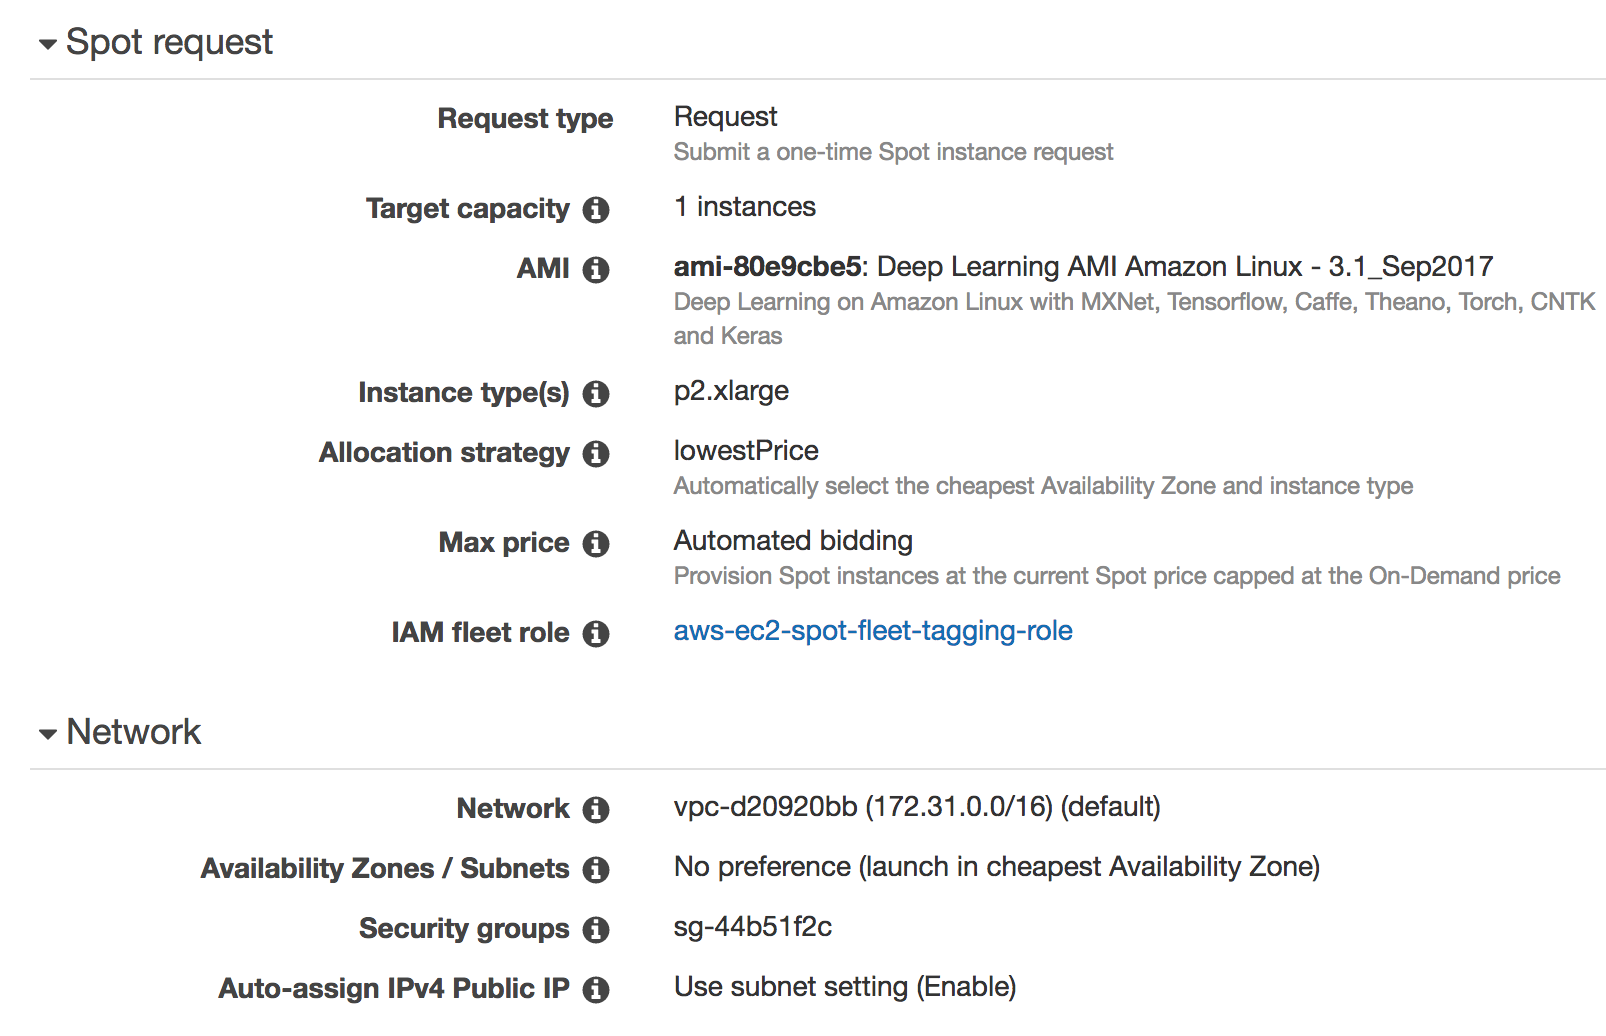
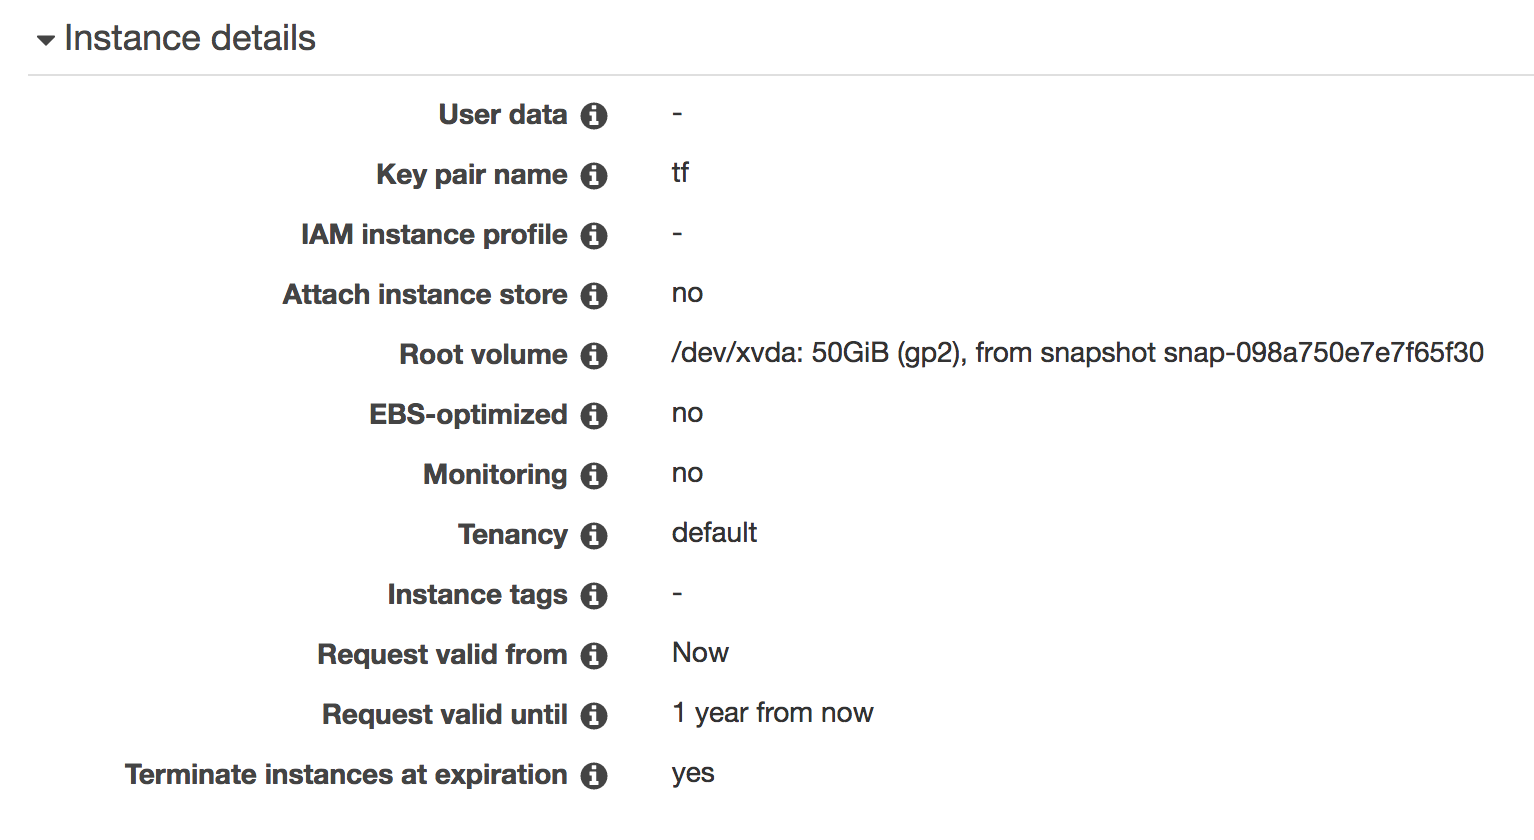
Review
The final configuration should look similar to:
ssh access
We copy our private key tf.pem into the home directory of our local machine and configure the ssh to access the spot instance.
cd ~/.ssh
mv ../tf.pem .    # Change the location of ../tf.pem accordingly
chmod og-r tf.pem
Edit the ssh configuration
vi config
Replace the hostname with your public IP address of the spot instance:
Host tf
    Hostname xx.xx.xx.xx
    Port 22
    User ec2-user
    ServerAliveInterval 60
    IdentityFile ~/.ssh/tf.pem
To access the spot instance:
ssh tf
Testing
We should see K80 as the GPU when we run nvidia-smi on the spot instance.
$ nvidia-smi
Tue Sep 19 18:36:16 2017
+-----------------------------------------------------------------------------+
| NVIDIA-SMI 375.66                 Driver Version: 375.66                    |
|-------------------------------+----------------------+----------------------+
| GPU  Name        Persistence-M| Bus-Id        Disp.A | Volatile Uncorr. ECC |
| Fan  Temp  Perf  Pwr:Usage/Cap|         Memory-Usage | GPU-Util  Compute M. |
|===============================+======================+======================|
|   0  Tesla K80           On   | 0000:00:1E.0     Off |                    0 |
| N/A   64C    P8    30W / 149W |      0MiB / 11439MiB |      0%      Default |
+-------------------------------+----------------------+----------------------+

+-----------------------------------------------------------------------------+
| Processes:                                                       GPU Memory |
|  GPU       PID  Type  Process name                               Usage      |
|=============================================================================|
|  No running processes found                                                 |
+-----------------------------------------------------------------------------+
To find the CUDA version (version 8):
$ nvcc --version
nvcc: NVIDIA (R) Cuda compiler driver
Copyright (c) 2005-2016 NVIDIA Corporation
Built on Tue_Jan_10_13:22:03_CST_2017
Cuda compilation tools, release 8.0, V8.0.61
To find the CuDNN version (version 5.1):
cat /usr/local/cuda/include/cudnn.h | grep CUDNN_MAJOR -A 2
#define CUDNN_MAJOR      5
#define CUDNN_MINOR      1
#define CUDNN_PATCHLEVEL 10
--
#define CUDNN_VERSION    (CUDNN_MAJOR * 1000 + CUDNN_MINOR * 100 + CUDNN_PATCHLEVEL)

#include "driver_types.h"
Run a TensorFlow application from the TensorFlow distribution:
git clone https://github.com/tensorflow/tensorflow.git
Run the MNist application. It will take a couple minute for the application to download the MNIst dataset.
python3 tensorflow/tensorflow/examples/tutorials/mnist/fully_connected_feed.py
Successfully downloaded train-images-idx3-ubyte.gz 9912422 bytes.
Extracting /tmp/tensorflow/mnist/input_data/train-images-idx3-ubyte.gz
Successfully downloaded train-labels-idx1-ubyte.gz 28881 bytes.
Extracting /tmp/tensorflow/mnist/input_data/train-labels-idx1-ubyte.gz
Successfully downloaded t10k-images-idx3-ubyte.gz 1648877 bytes.
Extracting /tmp/tensorflow/mnist/input_data/t10k-images-idx3-ubyte.gz
Successfully downloaded t10k-labels-idx1-ubyte.gz 4542 bytes.
Extracting /tmp/tensorflow/mnist/input_data/t10k-labels-idx1-ubyte.gz
2017-09-19 18:39:57.043575: W tensorflow/core/platform/cpu_feature_guard.cc:45] The TensorFlow library wasn't compiled to use SSE4.1 instructions, but these are available on your machine and could speed up CPU computations.
2017-09-19 18:39:57.043605: W tensorflow/core/platform/cpu_feature_guard.cc:45] The TensorFlow library wasn't compiled to use SSE4.2 instructions, but these are available on your machine and could speed up CPU computations.
2017-09-19 18:39:57.043611: W tensorflow/core/platform/cpu_feature_guard.cc:45] The TensorFlow library wasn't compiled to use AVX instructions, but these are available on your machine and could speed up CPU computations.
2017-09-19 18:39:57.043615: W tensorflow/core/platform/cpu_feature_guard.cc:45] The TensorFlow library wasn't compiled to use AVX2 instructions, but these are available on your machine and could speed up CPU computations.
2017-09-19 18:39:57.043619: W tensorflow/core/platform/cpu_feature_guard.cc:45] The TensorFlow library wasn't compiled to use FMA instructions, but these are available on your machine and could speed up CPU computations.
2017-09-19 18:39:58.214521: I tensorflow/stream_executor/cuda/cuda_gpu_executor.cc:893] successful NUMA node read from SysFS had negative value (-1), but there must be at least one NUMA node, so returning NUMA node zero
2017-09-19 18:39:58.215033: I tensorflow/core/common_runtime/gpu/gpu_device.cc:955] Found device 0 with properties:
name: Tesla K80
major: 3 minor: 7 memoryClockRate (GHz) 0.8235
pciBusID 0000:00:1e.0
Total memory: 11.17GiB
Free memory: 11.11GiB
2017-09-19 18:39:58.215056: I tensorflow/core/common_runtime/gpu/gpu_device.cc:976] DMA: 0
2017-09-19 18:39:58.215062: I tensorflow/core/common_runtime/gpu/gpu_device.cc:986] 0:   Y
2017-09-19 18:39:58.215069: I tensorflow/core/common_runtime/gpu/gpu_device.cc:1045] Creating TensorFlow device (/gpu:0) -> (device: 0, name: Tesla K80, pci bus id: 0000:00:1e.0)
Step 0: loss = 2.32 (7.246 sec)
Step 100: loss = 2.18 (0.002 sec)
Step 200: loss = 1.95 (0.002 sec)
Step 300: loss = 1.75 (0.002 sec)
Step 400: loss = 1.29 (0.002 sec)
Step 500: loss = 1.09 (0.002 sec)
Step 600: loss = 0.87 (0.001 sec)
Step 700: loss = 0.77 (0.001 sec)
Step 800: loss = 0.67 (0.002 sec)
Step 900: loss = 0.54 (0.002 sec)
Training Data Eval:
  Num examples: 55000  Num correct: 46762  Precision @ 1: 0.8502
Validation Data Eval:
  Num examples: 5000  Num correct: 4274  Precision @ 1: 0.8548
Test Data Eval:
  Num examples: 10000  Num correct: 8560  Precision @ 1: 0.8560
Step 1000: loss = 0.45 (0.007 sec)
Step 1100: loss = 0.50 (0.101 sec)
Step 1200: loss = 0.48 (0.002 sec)
Step 1300: loss = 0.46 (0.001 sec)
Step 1400: loss = 0.46 (0.001 sec)
Step 1500: loss = 0.53 (0.002 sec)
Step 1600: loss = 0.54 (0.002 sec)
Step 1700: loss = 0.39 (0.001 sec)
Step 1800: loss = 0.50 (0.002 sec)
Step 1900: loss = 0.45 (0.001 sec)
Training Data Eval:
  Num examples: 55000  Num correct: 49169  Precision @ 1: 0.8940
Validation Data Eval:
  Num examples: 5000  Num correct: 4526  Precision @ 1: 0.9052
Test Data Eval:
  Num examples: 10000  Num correct: 9013  Precision @ 1: 0.9013
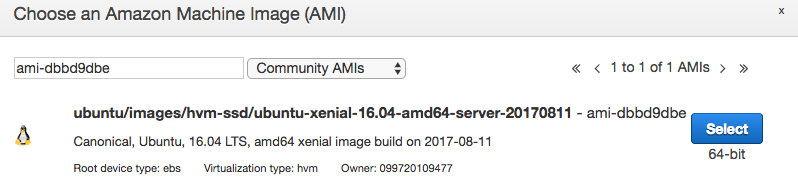
Build a Ubuntu TensorFlow
Instead of creating an EC2 instance from a Deep Learning AMI, this section creates an EC2 P2 instance from an Ubuntu AMI.
The Ubuntu AMI id can be located here by searching “64 us ebs 16.04 HVM” for the US region.
| US East (Ohio) | us-east-2 |
| US East (N. Virginia) | us-east-1 |
| US West (N. California) | us-west-1 |
| US West (Oregon) | us-west-2 |
Spot instance information:

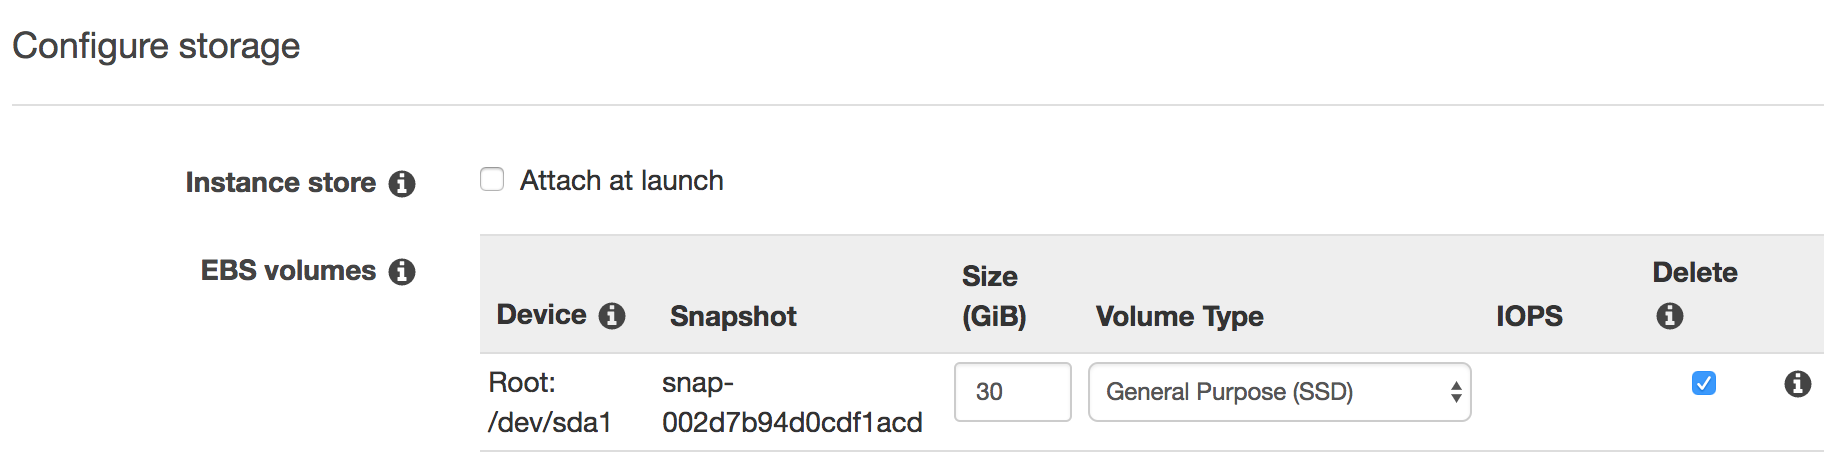
Also increase the SSD storage size
Since this is Ubuntu, we need to change the user from ec2-user to ubuntu in the ssh configuration.
Host tf
    Hostname xx.xx.xx.xx
    Port 22
    User ubuntu
    ServerAliveInterval 60
    IdentityFile ~/.ssh/tf.pem
After creating the instance, we ssh’ed into the system and verify we have a Nvidia GPU.
ssh tf
$ lspci | grep -i nvidia
00:1e.0 3D controller: NVIDIA Corporation GK210GL [Tesla K80] (rev a1)
Install & upgrade pre-requisite package
sudo apt-get update
sudo apt-get --assume-yes upgrade
sudo apt-get --assume-yes install build-essential
CUDA 8
To install a new version of TensorFlow, we need to verify the version of CUDA and CuDNN that it supports. Go to the Nvidia developer web site to locate the new download if it is different from below.
Install CUDA 8.0
wget http://developer.download.nvidia.com/compute/cuda/repos/ubuntu1604/x86_64/cuda-repo-ubuntu1604_8.0.61-1_amd64.deb
sudo dpkg -i cuda-repo-ubuntu1604_8.0.61-1_amd64.deb
sudo apt-get update
sudo apt-get install cuda
Add CUDA to PATH and LD_LIBRARY_PATH
cat >> ~/.bashrc << 'EOF'
export PATH=/usr/local/cuda-8.0/bin${PATH:+:${PATH}}
export LD_LIBRARY_PATH=/usr/local/cuda-8.0/lib64\
${LD_LIBRARY_PATH:+:${LD_LIBRARY_PATH}}
EOF
source ~/.bashrc
Verify CUDA installation
$ nvcc --version
vcc: NVIDIA (R) Cuda compiler driver
Copyright (c) 2005-2016 NVIDIA Corporation
Built on Tue_Jan_10_13:22:03_CST_2017
Cuda compilation tools, release 8.0, V8.0.61

$ nvidia-smi

Wed Sep 20 01:26:38 2017
+-----------------------------------------------------------------------------+
| NVIDIA-SMI 384.66                 Driver Version: 384.66                    |
|-------------------------------+----------------------+----------------------+
| GPU  Name        Persistence-M| Bus-Id        Disp.A | Volatile Uncorr. ECC |
| Fan  Temp  Perf  Pwr:Usage/Cap|         Memory-Usage | GPU-Util  Compute M. |
|===============================+======================+======================|
|   0  Tesla K80           Off  | 00000000:00:1E.0 Off |                    0 |
| N/A   45C    P0    74W / 149W |      0MiB / 11439MiB |     98%      Default |
+-------------------------------+----------------------+----------------------+
Upgrade again and reboot
sudo apt-get --assume-yes dist-upgrade
sudo reboot
CuDNN 6
Download the CuDNN here to your local machine and copy the zip file to the server (assume the ssh is configured correctly for tf):
scp cudnn-8.0-linux-x64-v6.0.tgz ubuntu@tf:~
In the spot instance:
cd
tar -xzf cudnn-8.0-linux-x64-v6.0.tgz
cd cuda
sudo cp lib64/* /usr/local/cuda/lib64/
sudo cp include/* /usr/local/cuda/include/
To speed up the performance:
sudo nvidia-smi -pm 1     # Configure the GPU setting to be persistent
sudo nvidia-smi --auto-boost-default=0 # Disable autoboost
sudo nvidia-smi -ac 2505,875           # Set GPU clock speed to the highest
Verify the installation again:
nvidia-smi
Anaconda3
We are installing Anaconda3 for the datascience libraries.
cd
wget https://repo.continuum.io/archive/Anaconda3-4.4.0-Linux-x86_64.sh
bash Anaconda3-4.4.0-Linux-x86_64.sh -b
cat >> ~/.bashrc << 'EOF'
export PATH=$HOME/anaconda3/bin:${PATH}
EOF
source .bashrc

conda upgrade -y --all
Note, we are running in Python 3.
Create a new env. tf and we activate it.
conda create --name tf
source activate tf
Note, whenever we logout from a session, we need to set the env again.
source activate tf
It is important to source activate tf to the correct environment before running the TensorFlow app.
All and the current env. can be found by:
(tf) $ conda info --envs
# conda environments:
#
tf                    *  /home/ubuntu/anaconda3/envs/tf
root                     /home/ubuntu/anaconda3
To end the session if we are done:
source deactivate
Install TensorFlow
source activate tf  # if we are not in tf env.
pip install tensorflow-gpu
Run the TensorFlow application. (This will take a few minutes to first download the dataset.)
git clone https://github.com/tensorflow/tensorflow.git
python tensorflow/tensorflow/examples/tutorials/mnist/fully_connected_feed.py
Build TensorFlow
As shown below, the official TensorFlow release was built with generic settings but not with the optimized settings for your computer.
The TensorFlow library wasn't compiled to use SSE4.1 instructions, but these are available on your machine and could speed up CPU computations.
The TensorFlow library wasn't compiled to use SSE4.2 instructions, but these are available on your machine and could speed up CPU computations.
The TensorFlow library wasn't compiled to use AVX instructions, but these are available on your machine and could speed up CPU computations.
The TensorFlow library wasn't compiled to use AVX2 instructions, but these are available on your machine and could speed up CPU computations.
The TensorFlow library wasn't compiled to use FMA instructions, but these are available on your machine and could speed up CPU computations.
However, in our GAN application, we do not see significant performance improvement. (Details later)
Here, we are building TensorFlow manually. Checkout TensorFlow if not done already. (This is done in previous steps. )
$ cd
$ git clone https://github.com/tensorflow/tensorflow.git
Switch to v1.3.1
$ cd ~/tensorflow
$ git checkout v1.3.1
Install bazel (the build tool)
conda install -c conda-forge bazel
Configure the build
- Make sure to enable CUDA
(tf) $ ./configure
...
Do you wish to build TensorFlow with CUDA support? [y/N] y
(tf) $ ./configure
Extracting Bazel installation...
.........
You have bazel 0.4.5- installed.
Please specify the location of python. [Default is /home/ubuntu/anaconda3/bin/python]:
Found possible Python library paths:
  /home/ubuntu/anaconda3/lib/python3.6/site-packages
Please input the desired Python library path to use.  Default is [/home/ubuntu/anaconda3/lib/python3.6/site-packages]

Using python library path: /home/ubuntu/anaconda3/lib/python3.6/site-packages
Do you wish to build TensorFlow with MKL support? [y/N] y
MKL support will be enabled for TensorFlow
Do you wish to download MKL LIB from the web? [Y/n]
Please specify optimization flags to use during compilation when bazel option "--config=opt" is specified [Default is -march=native]:
Do you wish to use jemalloc as the malloc implementation? [Y/n]
jemalloc enabled
Do you wish to build TensorFlow with Google Cloud Platform support? [y/N]
No Google Cloud Platform support will be enabled for TensorFlow
Do you wish to build TensorFlow with Hadoop File System support? [y/N]
No Hadoop File System support will be enabled for TensorFlow
Do you wish to build TensorFlow with the XLA just-in-time compiler (experimental)? [y/N]
No XLA support will be enabled for TensorFlow
Do you wish to build TensorFlow with VERBS support? [y/N]
No VERBS support will be enabled for TensorFlow
Do you wish to build TensorFlow with OpenCL support? [y/N]
No OpenCL support will be enabled for TensorFlow
Do you wish to build TensorFlow with CUDA support? [y/N] y
CUDA support will be enabled for TensorFlow
Do you want to use clang as CUDA compiler? [y/N]
nvcc will be used as CUDA compiler
Please specify the CUDA SDK version you want to use, e.g. 7.0. [Leave empty to default to CUDA 8.0]:
Please specify the location where CUDA 8.0 toolkit is installed. Refer to README.md for more details. [Default is /usr/local/cuda]:
Please specify which gcc should be used by nvcc as the host compiler. [Default is /usr/bin/gcc]:
Please specify the cuDNN version you want to use. [Leave empty to default to cuDNN 6.0]:
Please specify the location where cuDNN 6 library is installed. Refer to README.md for more details. [Default is /usr/local/cuda]:
Please specify a list of comma-separated Cuda compute capabilities you want to build with.
You can find the compute capability of your device at: https://developer.nvidia.com/cuda-gpus.
Please note that each additional compute capability significantly increases your build time and binary size.
[Default is: "3.7"]:
Do you wish to build TensorFlow with MPI support? [y/N]
MPI support will not be enabled for TensorFlow
Configuration finished
Install libcupti-dev
sudo apt-get install libcupti-dev
Build TensorFlow (Will take an 1 hour)
bazel build --cxxopt="-D_GLIBCXX_USE_CXX11_ABI=0" --config=opt --config=cuda //tensorflow/tools/pip_package:build_pip_package
Replace the TensorFlow
bazel-bin/tensorflow/tools/pip_package/build_pip_package ~/

cd
ls -al *.whl
pip uninstall tensorflow-gpu
pip install tensorflow-1.3.1-cp36-cp36m-linux_x86_64.whl
cd
python tensorflow/tensorflow/examples/tutorials/mnist/fully_connected_feed.py
Create a new AMI
We can use the new instance to create a new AMI to built a new instance without going through the previous steps.

Once a new instance is created with the new AMI, we need to
sudo nvidia-smi -pm 1     # Configure the GPU setting to be persistent
sudo nvidia-smi --auto-boost-default=0 # Disable autoboost
sudo nvidia-smi -ac 2505,875           # Set GPU clock speed to the highest
This AMI is available publicly as ami-5db19338 on us-east-2 region (Ohio).
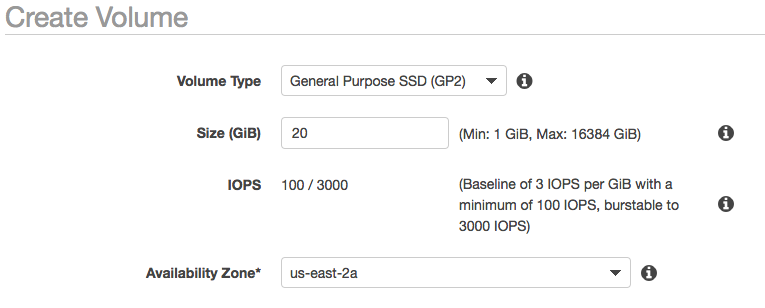
Attach a EBS for permanent data
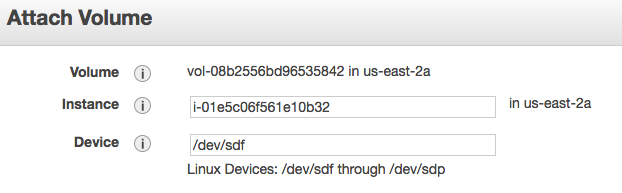
In the AWS console, we create a new volume under the elastic block store.
Then we attached the EBS to our instance.
Login to the instance and verify the new EBS is available.
$ lsblk
NAME    MAJ:MIN RM SIZE RO TYPE MOUNTPOINT
xvda    202:0    0  30G  0 disk
└─xvda1 202:1    0  30G  0 part /
xvdf    202:80   0  20G  0 disk
Our new drive is called xvdf above.
Check if it is empty. (If the output is “/dev/xvdf: data”, it is empty. )
$ sudo file -s /dev/xvdf
/dev/xvdf: data
Format the drive if it is empty. WARNING: This will erase data on xvdf.
sudo mkfs -t ext4 /dev/xvdf
Create a new directory for your application and data.
mkdir /home/ubuntu/gan
Note: If you want to have multiple applications to run in this instance, you should create a directory like “/data” instead.
Mount the drive to the new directory
sudo mount /dev/xvdf /home/ubuntu/gan
Change the directory ownership
sudo chown -R ubuntu:ubuntu /home/ubuntu/gan
Verify
$ df -h
Filesystem      Size  Used Avail Use% Mounted on
udev             30G     0   30G   0% /dev
tmpfs           6.0G  8.9M  6.0G   1% /run
/dev/xvda1       30G   16G   14G  54% /
tmpfs            30G     0   30G   0% /dev/shm
tmpfs           5.0M     0  5.0M   0% /run/lock
tmpfs            30G     0   30G   0% /sys/fs/cgroup
tmpfs           6.0G     0  6.0G   0% /run/user/1000
/dev/xvdf        20G   44M   19G   1% /home/ubuntu/gan
To enable auto-mount on reboot, we need to locate the UUID for the new EBS.
$ sudo cp /etc/fstab /etc/fstab.bak
$ sudo blkid
/dev/xvda1: LABEL="cloudimg-rootfs" UUID="5ba6ba49-ee5b-42b0-93f7-2f2b89fc1c71" TYPE="ext4" PARTUUID="ac6c9084-01"
/dev/xvdf: UUID="abe58d1a-8037-477d-9034-777e1b31fa35" TYPE="ext4"
Edit the automunt file.
sudo vi /etc/fstab
Replace the UUID with the one for your ESB and add the line below to the file
UUID=abe58d1a-8037-477d-9034-777e1b31fa35 /home/ubuntu/gan ext4 noatime,defaults 0 0
Note: consult with your system admin for the mount options and flags.
Performance comparison
No doubt, a machine with GPU runs a TensorFlow application much faster. Our TensorFlow application Generative adversary network GAN runs 25 times faster in the P2 instance than a local Mac machine. However, this is a poor comparison because our 4-year old Mac has a slower CPU. Nevertheless, the speed improvement is significant since we need to run our GAN application overnight in P2 to even show some reasonable result. Running GAN on a machine without GPU is not feasible.
Does it worth to build a custom environment rather than using the Amazon Deep Learning AMI? Amazon deep learning AMI creates an environment in minutes with all the important packages. But it charges extra per hour for the software. To build our own custom system, we can use the latest version of CUDA, CuDNN and Python libraries. But un-expected issues will often pop up that will take time to resolve. The first built may take hours to finish. But once an AMI is built, there are not much difference to create a new instance. Does it worth it to rebuilt the TensorFlow code with the CPU optimization for the computer? Our GAN application uses CNN. ReLU, fully connected network heavily. From end to end, we see no speed improvement. We suspect most important tasks are done in the GPU which the CPU optimization does not make an impact. Nevertheless, we do realize the variable initialization and checkpoint saving is much faster in our custom build. But it is not frequent enough to make a difference. It is still in-conclusive on whether a custom TensorFlow build is faster. In our situration, it is not significant for our GAN application.